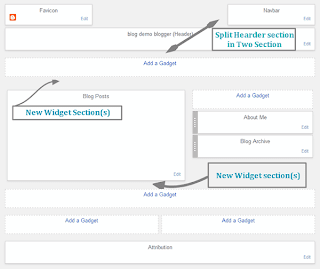
What is Code for Adding Gadget/Widget Sections in Blogger
For adding a gadget or widget section in your blogger blog; following code is the only way to do so;
<b:section class='newsectionclass' id='uniquesectionid' maxwidgets='1' showaddelement='yes'/><div style='clear: both;'/>
You can add a
b:section tag anywhere between <body> and </body> in your blogger blog. See the table below to know about the b:section tag and its attributes;| Element | description |
| <b:section | b:section tag indicates the place or section to add widget/gadget in the blogger blog.For adding gadget this code is a must. You can add this tag anywhere in between the body tag of your blogger template. |
| class='newsectionclass' | The class of a b:section tag. It is better to use a unique class of this. |
| id='uniquesectionid' | The id of the b:section tag and it must be a unique one. This is also handy if you want to add custom CSS code for it. |
| maxwidgets='1' | Indicates the number of gadgets or widgets can be used inside the section. Value starts from 1. If you do not use this then you can as many gadgets in the section as you like. |
| showaddelement='yes' | Values of showadddelement are yes and no. If it is set yes; then you will see Add a Gadget link in the layout tab of your Blogger blog’s dashboard. If it is set no; then you will not see Add a Gadget link in the layout tab of Blogger dashboard. |
Yes it is that simple; just add the
b:section tag inside your template and you can add gadgets or widgets in that section of your blogger template. Remember before making any sort of customization in your Blogger template you should create a backup copy of it.In below you will see some typical places where one might require to add gadgets section or edit existing gadget sections in the Blogger blog and how to add and customized them.
How to Add Widget Section Below the Post in Blogger
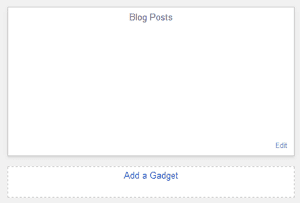
It's great if you have a separate widget section just below or above the post widget in Blogger.
After backing up your template;
- Go to Blogger dashboard > Template > click 'Edit HTML'.
- Look for the following code;
- Just after closing the
b:sectionmain paste your new widget section codes like this; - Click 'Save template'.
<b:section class='main' id='main' showaddelement='yes'>
<b:section class='main' id='main' showaddelement='no'>
<b:widget id='Blog1' locked='true' title='Blog Posts' type='Blog'>...
</b:widget>
</b:section>
<b:section class='main-bottom' id='main-bottom' showaddelement='yes'/>
If you want to add two widgets or section side by side then follow the instructions below;
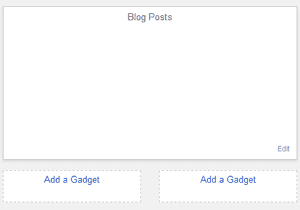
- At the step-3 in the above instructions paste two
b:sectiontag like this; - Search for
]]></b:skin>in the template editor and Add following CSS code for displaying them side by side. Also you can add this in a style tag in your template too. - Save the template.
<b:section class='main' id='main' showaddelement='no'>
<b:widget id='Blog1' locked='true' title='Blog Posts' type='Blog'>...</b:widget>
</b:section>
<b:section class='main-bottom-left' id='main-bottom-left' showaddelement='yes'/>
<b:section class='main-bottom-right' id='main-bottom-right' showaddelement='yes'/>
<div style='clear: both;'/>
For showing widgets side by side you must use
<div style='clear: both;'/> after the two b:section tags.#main-bottom-left {width:48%;float:left;display:inline;}
#main-bottom-right {width:48%;float:right;display:inline;}
Change the width in the CSS code until you get it right according to you template.
How to Add Widget Section Above the Post in Blogger
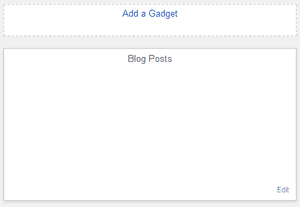
The codes and process is almost the same if you want to add one, two or more widget section. For this;
- Go to Blogger dashboard > Template > click 'Edit HTML'.
- Look for the following code;
- Paste you new
b:sectioncode just before it. like this - Click save template.
<b:section class='main' id='main' showaddelement='no'>
<b:section class='main-bottom-left' id='main-bottom-left' showaddelement='yes'/>
<b:section class='main-bottom-right' id='main-bottom-right' showaddelement='yes'/>
<div style='clear: both;'/>
<b:section class="main" id="main" showaddelement="no">...</b:section>
Here also if you want to add two widgets section side by side just above the post widget; then follow the instructions below;
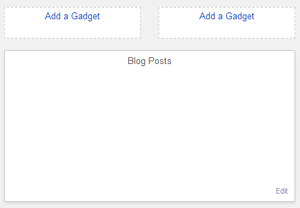
- at the step-3 in the above instructions paste two
b:sectiontag like this; - Search for
]]></b:skin>in the template editor and add the CSS code below just before it for displaying them side by side. You can also add this in a style tag in your template too. - Save the template.
<b:section class='main-top-left' id='main-top-left' showaddelement='yes'/>
<b:section class='main-top-right' id='main-top-right' showaddelement='yes'/>
<div style='clear: both;'/>
<b:section class='main' id='main' showaddelement='no'>
<b:widget id='Blog1' locked='true' title='Blog Posts' type='Blog'>...</b:widget>
</b:section>
For showing widgets side by side you must use
<div style='clear: both;'/> after the two b:section tags.#main-top-left {width:48%;float:left;display:inline;}
#main-top-right {width:48%;float:right;display:inline;}
Adjust width in the CSS code until you get it right according to you template.
How to Add a gadget/widget section in the header

One of the great places to add ads or a search box is at the right side of your blog's logo or name. For this you will need to add a new gadget/widget section in the Blogger template.
For this follow the instructions below;
- In the template look for this code;
- Just after closing
<b:section class='header' id='header' maxwidgets='1' showaddelement='no'>paste the followingb:sectiontag like this; - Now search for
]]></b:skin>in the template and add the below CSS code just before it. You can also add this in a style tag in your template too. - After this click 'Save template'.
<b:section class='header' id='header' maxwidgets='1' showaddelement='no'>
<b:section class='header' id='header' maxwidgets='1' showaddelement='no'>
<b:widget id='Header1' locked='true' title='blog demo blogger (Header)' type='Header'>...</b:widget>
</b:section><b:section class='header-right' id='header-right' showaddelement='yes'/>
<div style='clear: both;'/>
#header {width:50%;display:inline-block;float:left;}
#header-right{width:40%;display:inline-block;float:right;}
Adjust the widths in the CSS code according to your blog's style and layout.
Remember the main code for adding a new gadget/widget section is one that is give at the top. All you need to do is find where you want to add this code and how you want to customize it.
Hope this post helped you in customizing your Blogger template. If you need any help on this do mention it in the comments section.